Congrats! You’re On The List!
But let’s make sure you actually receive my emails

So, here’s the deal…
Most email service providers and Internet companies are now using programs to block unwanted e-mail, often called spam. But sometimes, these programs block e-mail you actually want to get 😫 Frustrating, right?!
To Make Sure You Are Receiving Your Weekly Mogul Mails Do This:
Add support@tiyanarobinson.com to your email whitelist to to make sure you get our emails.
NOTE : A whitelist is basically just a list of accepted items or persons in a set…. a list of e-mail addresses or domain names from which an e-mail blocking program will allow messages to be received.
Whitelist us right away before our juicy emails get blocked.
Why is this important?
Unwanted ad emails that you don’t want are known as ”spam”. And you probably already get a ton of those. The problem has escalated to the point that most Internet Service Providers have put a blocking or filtering system in place instead of only relying on blacklists to tell the good guys from the bad.
As you can imagine, the current systems are not perfect, and they often block emails that you’ve requested!
But… there’s something you can do to keep your subscription’s content from falling into the filtering systems by mistake. You can fight the blacklist with a ”whitelist.”
And since every email system is different, here are some instructions to follow for the most popular ones. If yours isn’t here, simply contact your service provider and they’ll send you clear instructions.
Gmail:
1. In your inbox, locate an email from support@tiyanarobinson.com (I just sent you an email — check for it in the next couple minutes).
2. Drag this email to the “primary” tab of your inbox.
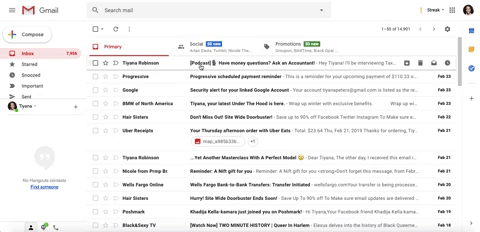
3. Once you do this, you’ll see that our emails will go to your primary folder in the future! Winning!
Yahoo! Mail
When opening an email message, a “+” symbol should display next to From: and the sender’s name. Select this and an “Add to contacts” pop-up should appear. Select “Save”:

Make sure to also check your spam folder in case our emails are being delivered there and mark them as ”not spam”.

Mac Mail
Select “Mail” and “Preferences” from the top menu.

In the “Preferences” window, click the “Rules” icon.
Click the “Add Rule” button.

In the “Rules” window, type a name for your rule in the “Description” field.
Use the following settings: “If any of the following conditions are met: From Contains.”
Type the sender’s email address in the text field beside “Contains.”

Select “Move Message” and “Inbox” from the drop-down menus.Click “Ok” to save the rule.